
Discover how tensegrity furniture blends precise cable geometry handcrafted work to create floating tables captivate and endure. This introductory guide explores the principles of tensegrity, the meticulous build process, and why bespoke, commission-based design delivers a conversation centerpiece for any space. geometry and materials finishing and tensioning, learn how expert craft ensures both visual wonder and performance.
Every tensegrity table we make begins the same way — with a length of steel, a sketch on graph paper, and the quiet certainty that physics will do what physics always does.
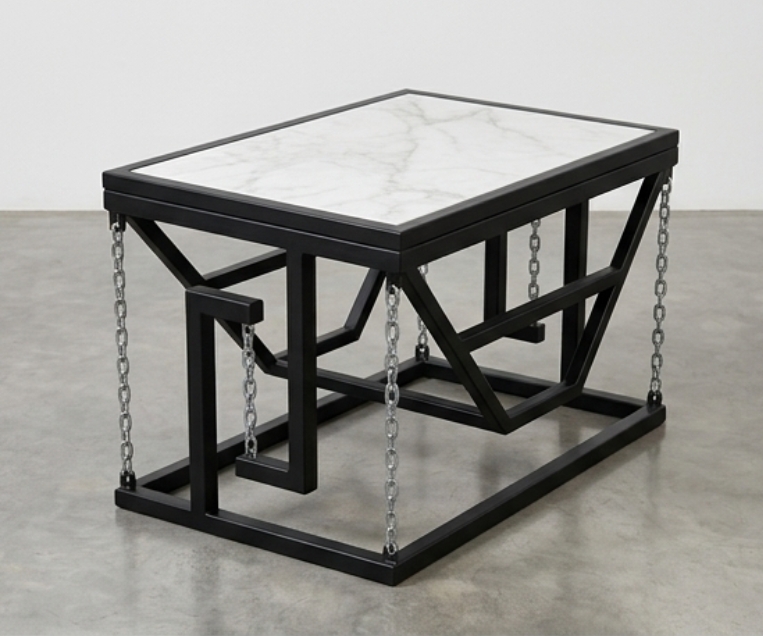
There is a moment in every tensegrity build when the cables go taut and the floating top plate lifts — and even after building dozens of these, that moment still stops you. It looks like a mistake in gravity. It looks like something that should fall. It doesn’t.
At Generosity Metal Innovators, we make tensegrity furniture by hand out of our workshop in Buloba, Wakiso, on the Mityana Road corridor west of Kampala. This post is a walk through exactly how that process works — from the first cut to the final finish — because we believe craft deserves to be seen, not just sold.
Tensegrity is a structural principle coined by architect Buckminster Fuller: a system held together entirely by the balance between tension (cables under pull) and compression (steel rods under push). There are no rigid joints connecting the top surface to the base. The table floats because every cable is pulling at exactly the right angle to keep every rod in place.
What Tensegrity Actually Means
What makes it difficult to build is the same thing that makes it beautiful to own: the tolerances are unforgiving. A cable that is 2mm too long will cause the whole structure to lean. Every measurement is a commitment.
The Build Process, Step by Step
Step 1 — Design and Geometry
We begin from a handwritten sketch to a CAD drawing , modelling the table in 3D to calculate exact cable angles and rod lengths before a single cut is made. The geometry varies by design — a three-point base behaves differently from a four-point — but the principle is constant: tension must be equal and opposite at every node. Once the model is locked, we produce a cutting sheet with every dimension listed to the millimetre.

Step 2 — Cutting and Forming the Steel
We use square hollow section and solid round bar, sourced locally in Kampala. Cutting is done with an angle grinder using a cutting disc, followed by filing and grinding to remove burrs. The top plate — depending on the design — is mild steel sheet, sometimes laser-cut to shape, sometimes hand-cut and dressed. Every edge is chamfered. Rough edges on a luxury piece are a failure.
“A cable that is 2mm too long will cause the whole structure to lean. Every measurement is a commitment.”
Step 3 — Welding the Base Frame
The base is welded, with fillet welds at every joint. We grind every weld flat and smooth — not because the weld is structural (it is) but because the finish is part of the product. We use an angle grinder and flap discs to achieve a consistent surface before moving to the next stage.
Step 4 — Drilling and Threading the Cable Anchor Points
Each rod end needs a drilled hole, tapped or fitted with a swaged end to accept the stainless cable. This is the most precise stage. We use a drilling machine and measure twice before every hole. The cable used is 6mm or 10mm mild steel chains as it is flexible and holds consistent tension over years of use.
Step 5 — Surface Finishing
Before assembly, every component is finished. Our standard finishes are:
- Raw brushed steel — wire-brushed and sealed with a clear lacquer for an industrial, honest look
- Matte black painting — We do this two way: Spraying automotive paint with an air compressor or sent to a local powder coating facility in Kampala for a hard, uniform finish
- Antique rust patina — chemically induced and sealed, for clients who want the warmth of aged iron
- Custom colour powder coat — available on request, matching RAL or Pantone references
Step 6 — Assembly and Tensioning
This is where the table either works or it doesn’t. Cables are threaded and hand-tightened in sequence — never one at a time to completion, but all together in passes, like tuning a stringed instrument. We use turnbuckles or crimped ferrules depending on the design. The final tension check is done by load test: we apply weight to the top plate and watch every cable. Any that go slack get another pass.
Step 7 — Top Surface and Delivery
The top surface is fixed last — either a steel plate, a tempered glass panel, or a ceramic tile insert depending on the commission. It is secured so that it can be removed for shipping if needed. Every table leaves the workshop with a care card explaining how to maintain cable tension over time.
Why We Build This Way
We could simplify. Rigid welded frames are faster to make. But there is something about a tensegrity table that earns its place in a room — it is not background furniture, it is a conversation. Guests ask about it. They reach under it looking for the support. They can’t find it.
Every piece we make is built to commission, to the client’s dimensions, finish, and top material. We don’t keep stock. We make your specific table, for your specific space.
Commission a Piece
Tensegrity tables start at $135 USD for a standard side table configuration. Lead time is 5–13working days from initial deposit. We ship internationally and deliver across Uganda where we are based. If you are in Uganda or anywhere accessible as long as it is planet Earth. Request for your price and customization requests.
Leave a Reply